Implementing Google Analytics 4: Common Pitfalls and How to Avoid Them
By Jeremy Neilson | November 28, 2023 | Google Analytics 4
Set up GA4 with ease and ensure your website analytics are on point. Follow our guide for a smooth transition. Get started now!

Google’s newest generation of web analytics makes it easier than ever to stay on top of everything going on on your website. While the platform has been developed so that customization and tailoring of the experience are extremely rich features, it can only be that way once everything has been set up properly. In this article, we’ll dive into installing GA4 on your website, what can go wrong, and should that happen, how to fix it.
Firstly, let’s understand generally how to install a tag on your website. Google gives two methods of doing so. Keep in mind that no matter what, you’re going to need access to your website’s backend.
Method #1: Google Tag (gtag.js)
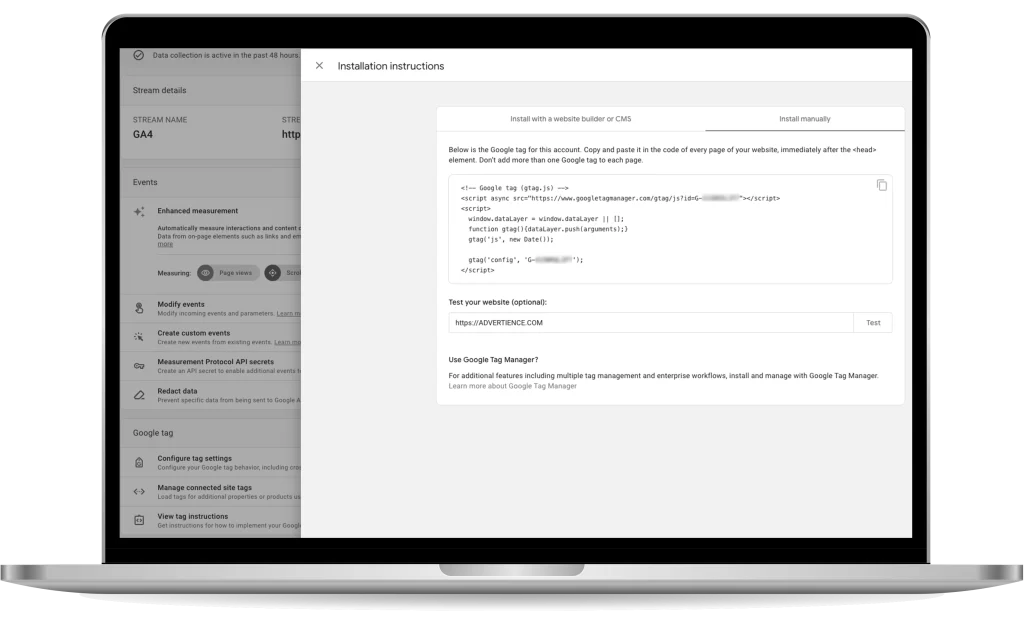
For instructions on how to install gtag.js on your website, go to your GA4 property -> Admin -> Data Streams, and click the stream that you want to install it on. In the new tab, select ‘View Tag Instructions’ at the bottom, and you should see a code snippet that you need to copy and paste into the website source code <head> of every page of your site.
Pitfall: Pasting the code in the wrong place!
We go into more detail about this when talking about the GTM container code, but remember that an HTML page has a <head> tag that contains most of the website metadata, among other things. Make sure that: firstly, you’ve put the code inside the <head> tag, and secondly, outside of any other tags. You do not want to accidentally put the code in the <style> tag in the head of the page. To guarantee you don’t do this, paste the gtag.js code in the line immediately after the <head> tag.
The Google tag also has many different settings in GA4. While the default settings for the Google Tag should provide no problems, Google has documentation of what each setting does and where it applies. Check their table of settings to make sure the Google Tag is tailored to your site properly.
Here is the part where gtag.js gets more complicated. While GTM provides a separate interface for tracking and sending events to GA4, the Google Tag requires you to edit the source code for each new user-defined event you want to send. The gtag() function is a Javascript function that is called to send events and their parameters to GA4. If you don’t feel confident being able to add this sort of tracking in, we recommend getting your dev team to install these, or just use GTM instead.
If you want to continue using the gtag() function in your code, here are some pitfalls you might encounter. Before looking at these, check your code syntax, because there could be errors that are specific to you.
Pitfall: Incorrect event name!
When sending off events, the second parameter of the gtag() function is the name of the event. Ensure the spelling of the event matches exactly what you’re expecting in GA4.
Pitfall: Missing trigger!
Another issue you might have is not having a trigger for the gtag() function installed. Perhaps you correctly added the script that gets fired but forgot to call that script when your ‘Submit’ button is pressed. Maybe you call the wrong script when the button is pressed. These are all things to check, to make sure not only that the script has no syntax issues, but it actually gets to run when it’s supposed to.
Pitfall: Always triggering!
When adding gtag() function calls, make sure to put them in a wrapper function. If you just put them in <script> tags, they’ll get fired every page load, rather than after specific actions.
Method #2: Google Tag Manager (GTM)
This method requires much less use of Javascript and the website backend. With GTM, the website and the tracking are taken care of essentially as two separate entities. The website and interaction are all done as normal, hosted by whatever server or host you’ve set it up on, but the tracking and data collection are handled in GTM. Once you install the container on the website, GTM provides an entire interface for easily adding ‘tags’ to your website with specific triggers, and these tags are what send events to GA4. We don’t cover tags in-depth in this article, but you will know how to use GTM to install GA4 onto your website at the very least and you’ll be set up to continue tracking development from there.
Once you have your GA4 property set up and have made a GTM container, it’s time to link them all together with the website.
Installing GTM on the backend
This part requires editing the source code of the website. In your GTM container, you should see a code in the top right corner of the screen, something like ‘GTM-XXXXXXX’. Click it, and a tab should pop up giving you instructions for where to copy and paste code snippets to allow GTM to track your webpage.
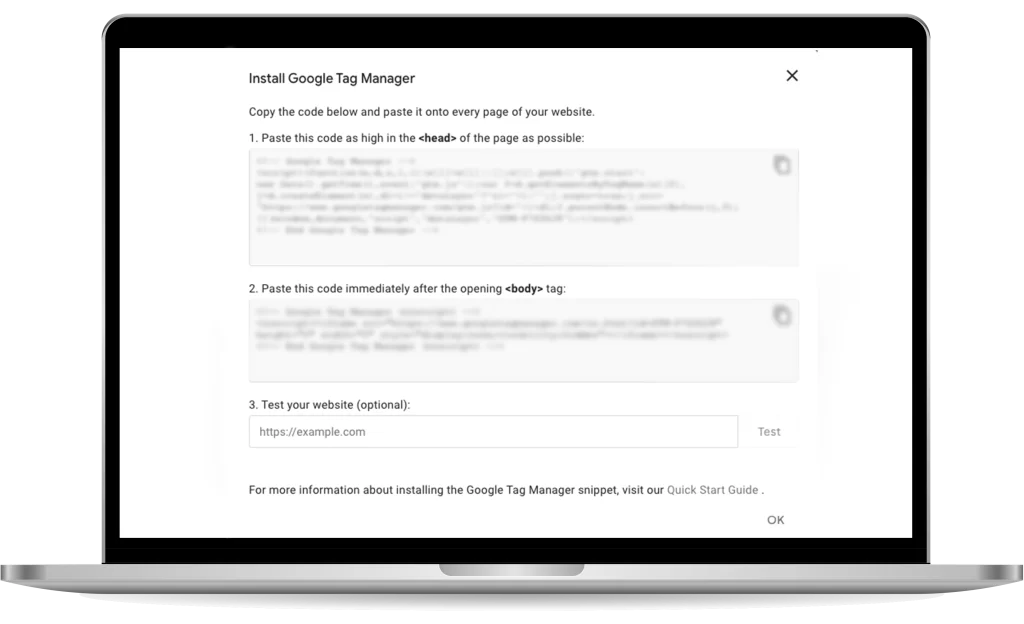
Pitfall: Not pasting all the code on the website!
This is a simple mistake, but it’s easily remediable, so it bears mentioning. To avoid missing sections of the code when copying it, Google’s code snippet tabs have a copy button in the top right. Click that rather than highlighting the text, and you’ll be guaranteed to copy the whole text.
Pitfall: Pasting the code in the wrong place!
If you’re the one who’s pasting the code in the website source code and doesn’t feel confident that you did it right, the easiest thing to do is check with your devs. If they can take a look for you, they should be able to help.
Not all of us have access to the dev team, or even have a dev team at all, though! What do you do in that case, then?
Let’s make sure you place it in the right sections. An HTML document is split largely into two sections: the head and the body. The two snippets of code go one in each, the first in the head, the second in the body. It can be confusing, because there’s likely lots of other stuff in each of these sections, but the most important thing is to make sure the code you paste is inside of the head/body tag, but not accidentally inside any other tags. What we mean by this is that your <body> tag might have several <div> tags nested inside of it, for example. You may have accidentally pasted GTM’s code inside one of these <div> tags, which does mean you put it in the <body> tag, but it’s nested further into the body than Google instructed us to put it, which could be what’s causing you issues. Check through the code, and to be really sure, paste the code on the line immediately beneath the <body> opening tag, to avoid this. This also similarly applies to the <head> tag.
Pitfall: Not checking the container is properly installed!
Another easy check you can do is make sure you actually put the <head> code in the <head> tag and the <body> code in the <body> tag, and don’t accidentally have them swapped.
Now that you have the code in the right spot, always check that the container is installed. In GTM, you can do this by pressing the ‘Preview’ button,

Entering in the website URL,

And looking on the Tag Assistant tab, to see if the container appears as a tab at the top. If it doesn’t, you still have issues regarding installation and need to check your code.

Using the GTM interface
This part requires little to no backend experience, and most pitfalls are really simple errors that can be fixed in a few clicks. The first major step we cover is creating a Google Tag and setting it to trigger on the initialization of every page.
Pitfall: Incorrect Measurement ID!
When installing your Google Tag, there’s one required parameter before you can save it, that being the Tag ID, or Measurement ID (in GA4). To make sure it’s correct, head to your GA4 property -> Admin -> Data Streams, and select the corresponding website.

Make sure that if there are multiple data streams, that you select the correct one. In the new tab, there is an option to copy the Measurement ID. Paste this again in GTM, and you should be good.
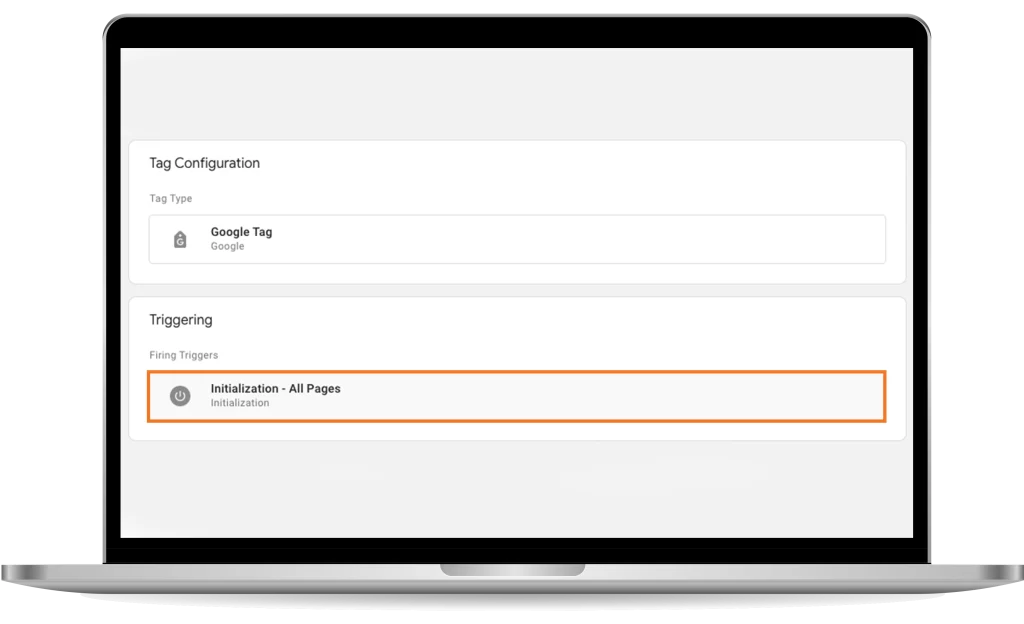
Pitfall: Incorrect Trigger!
Make sure when you create the Google Tag, that you set the right trigger. There are a bunch of built-in triggers, but the one we want is ‘Initialization – All Pages’. This will set the Google Tag up as soon as possible, so every event that occurs gets tracked, especially the ones that might occur as the page loads.
Takeaways
If you’ve done every step we mentioned and avoided every pitfall, your GTM container should be installed, tracking built-in events, and sending them off to your GA4 property. Remember that GTM also has the GA4 Event Tag should you wish to send special events that you define. It also has many other features to make website tracking extremely efficient and user-friendly. GTM has many benefits, especially for someone with little dev experience.
Already have an existing GA4 property? Have it audited to ensure the data you’re collecting is meaningful and trustworthy.
For additional information and guides to help you on your journey with Google Analytics 4, whether it’s your first time with the platform, or you’re a Google Analytics veteran, check out our other blog posts on GA4.